Showing posts with label Tips And Tricks. Show all posts
Showing posts with label Tips And Tricks. Show all posts
Its been a long time I am not able to post anything. It is because I am busy in something I cant even talk about. Finally I found some time to make a video and Finally here we are.
Whats the video is about :
Have you ever Been clicking pictures and edited on computer, If you need to post pictures on INSTAGRAM then we have to move the picture into the Mobile phones. I was looking for a solution which I can use on this Post.
This methods which is explained in the videos is Purely WebBrowser trick.
No " Android Emulator have been used"
Just a Browser trick on Windows 10 Will allow you to upload pictures from google chrome.
This Method is Been Using a Parameter Known as user-agent to manipulate the website
The Video is Down Below.. (Like this video and SUBSCRIBE to my Channel)
Today I have something more Important for you guys.. Its about The Zenfone's battery and RAM management.. Its important to Manage your battery an RAM to get More Battery power and make the mobile smoother.. Well today i will Give few points to follow in order to Get a Good Battery life and a Fastest Mobile performance...
So Lets get started...
. Always Try to boost Your RAM in Quick settings, It will help you to clear Unnecessary Background App uses and make your mobile faster
Install Apps when you need them and then delete if you are no longer using them.
Only keep those apps which you use too often..
Use Other Browsers not chrome.. Chrome uses more battery and performance for the better outlook of a Website you visit.. You can use UC browser or Opera mini to save battery, ram and your Data pack.
Do not use Live Wallpapers or any Animated things on Your home screen as well as lock screen because they take our ur memory as well as RAM..
Do not install apps like CC cleaner or any battery booted apps because they do nothing and take memory and battery too..
There are some apps which i strongly recommend for you
* Greenify Hibernation * Titanium Backup
These are the steps to make your mobile faster and to get more battery backup...
I hope guys you found this tutorial helpful.. If you know any other way to manager battery or ram then just drop your comment down and i will add them in this post and mention your name....
Admin ZenFone Blog
"-Vinaya"
Installing Latest TWRP in Zenfone 2 Laser ZE550KL
Hey, friends.
It's been a long time I didn't post any thread Because my semesters are ongoing and just 2 days before I finished my exams. By this time I have collected some of the good articles to post for you....
INTRODUCTION :
Today we will learn how to install TWRP Recovery in Asus Zenfone 2 laser ZE550KL.
TWRP (Team Win Recovery Project ), is an open source recovery image for Android Based devices. It provides a Touchscreen interface which allows users t install third party firmware and backup the current system, which are often unsupported by Stock Android Recovery images.
It is, Therefore, Often installed when rooting, Installing a custom ROM on android devices..
REQUIREMENTS :
* Install The Drivers properly... It's the most impotent step.
* The Operating System must be windows 7, Windows 8.1, Windows XP,
You can try windows 10 but I think the drivers will not be supported.
PROCEDURE :
1. Power off the Phone then Press and Hold Power volume up and power button.
2 .Now your phone will boot up and you will see fastboot mode.
3. Go to the Folder where you have downloaded the files from above
4. Now open CMD windows by pressing SHIFT plus Right click at the same time then press on Open Command Window here.
4. Now type the following command
5. After the phone gets rebooted turn off the phone then press volume down key + power key at the same time.
Congrats you will able to use TWRP to install custom ROM and also you can root your device using this Custom recovery. I hope you are able to do this process successfully. If you face any issue like "error loading" or "waiting for device" that means you didn't have installed the drivers properly. Soon I will create a thread where you can learn how to install the drivers properly.
Admin ZenFone Blog
"-Vinaya"
DOWNGRADE FROM MM TO LP ASUS ZENFONE 2 LASER ZE550KL 100% WORKING METHOD.
Today we will Continue with a new tutorial that will work 100% for everyone. Previously i have posted a ADB method to downgrade but after Looking for user comment i found that an error occurs while loading ZIP file.
Me too experienced the same. So i decided to create another tutorial that will help users to Downgrade from Android Marshmallow to Lollipop without any issue.
We are facing a lot of issue in Android Marshmallow because of unfixed bugs. Also WW SKU users got a update that will Upgrade Baseband ( MODEM ) version that will allow the phone to catch 4g VoLte Signals. As we all know asus for there faulty Updates, This time also the same thing happen.
Few got Updated to volte but other didn't.. Even they have upgraded the firmware but the Baseband version wont able to capture VoLte Signal.. Whatsoever we can expect a New Update is comming to hit the phone to fix The Baseband Issue..
Instructions :
Download The ADB and Stock Recovery | Click Here Password is = www.zenfonehelp.com
Download the Firmware that you want to Downgrade. | Click Here
Now copy the Firmware file to ExtSDcard ( Memory Card )
TurnOff The phone and go to Fastboot Mode ( Press Volume up + power Button at the same time and hold for 3 seconds )
Now Extract the Downloaded file in Step 1
Now open cmd.bat file and that will open a command window in the ADB and Recovery Folder
now type Fastboot Devices to verify your phone is connected to PC properly.( If yes then you will see your devices Serial number in that command window )
choose the ZIP firmware file which you have downloaded in step 2 and copyed to SDcard in step 3
wait for a While it will take upto 15-20 minute for the process to complete.. Dont touch or do anything while it is ongoing else you will brick the phone..
Password for the ZIP file is = www.zenfonehelp.com
NOTE: After complete of the process You have to reboot your device and this time your phone will took more time to bootUP dont be panic..
I hope you found this tutorial helpfull. If you didnt understand anything here then Comment down below i will try to answer as soon as possible or take the live chat option.
Admin ZenFone Blog
"-Vinaya"
Access Sdcard and Hack Whatsapp by Bypassing CM-Security AppLock
Hello, friends. I am blogging after a long time and that is because I was focusing on my studies.. :D
So now I am back with an Amazing trick that will bypass Cm-Security app lock so you can access Mobiles Sdcard and steal any data by just 2 simple steps.
Now let's discuss it.
It is like a trick that you can perform by Google Chrome. Google Chrome is Available in Play store you can download that using the link below. If you already have then ignored it.
*NOTE: Any Version of google chrome will work
So let's get started. Follow the steps thoroughly.
2. The Phone Phone from we will retrieve the data.
3. Dare to get the phone :P
Step 1:
Get the phone and start Google chrome.
Step 2 :
Now Type in browser search box
file:///sdcard (Pictures are below )
Step 3:
BOOOOM You are in SDcard and now you can go to WhatsApp folder and take the database, Transfer to your device and view that in your home by drinking a cup of coffee.
Now you can access the whole sdcard , You can look for the Photos, Videos and much more.. This Tutorial is tested on Zenfone 2 Laser and worked completely fine.
I hope you understand this method, If you didn't then you can comment down below, I will reply you soon.
Visit again for more fun
"Asus ZenFone Blog"
-Vinay
Free Pickup and Return service. If you want to return your mobile due to any issue then here is the 12 steps to get the job don. SOURCE: ZenTalk
Step 1: You must first contact with 1800209365Asus Customer care on this toll-free number : 18002090365
Step 2:
The Call Center will ask you to provide the following details
- Name
- Contact Number
- Address with Pin code
- Unit Serial Number
- Problem
Step 3:
The call center will respond to your query and provide the solution to you accordingly.
Step 4:
If the problem is not resolved then, the Call center will close the case... but if the problem still persists then check STEP 5 below
Step5:
If the problem is not resolved then, the Call center will offer following services to you
- Carry-in service ( The call center will guide you to nearest Service center from your location).
- Pickup And Return Service(PUR)- You are eligible for this if your location more than 50KM away from any service center Step 6:
If you are eligible for pickup and return and in case that you opt for the pickup and return service then, the call center will create a case and information the case ID to you. Step 7:
The Call center will then inform your about the Procedure of pickup and return Step 8:
Asus will verify all the details and will arrange the pickup through the Forwarder. Step 9:
The Forwarder will deliver an Empty Box to your premises. Step 10:
Then you may pack the faulty material or device and inform the Forwarder. Step 11:
The forwarder will pick up from given your location and deliver to RMA Step 12:
Once the repairing done by RMA, The forwarder will pick up the Material/Device and deliver it to you(Free Of Cost)
This tutorial is based on "Free Pickup and Return Service". I hope you guys understand it properly, if you have any doubts then comment Below.
Visit again for more fun
"Asus ZenFone Blog"
-Vinay
ADB Sideload To Asus ZenFone 2 Laser ZE550KL.
Hellow friends. Today we will do ADB Sideload to Asus ZenFone 2 Laser Ze500KL. This tutorial will be quite complicated and tricky so don't ignore any points otherwise you will be in trouble.
I have also made A Video Tutorial to do so, You can find that video in the bottom part of this post.
There are various step that we need to follow before proceeding to Sideload. The Steps we need to do before installation is written below.
1. OS specification.
2. Installing Proper ADB and Fastboot Drivers.
3. Preparing mobile
So let's start with these Points.
OS specification:
Operating System requirements are the most important. We need a correect operating system to install drivers and Do ADB sideload.
You can use From Windows XP to Windows 8.1. You can't use windows 10 because this OS is totally new and no drivers have released yet from Asus to Install on it.
Installing Proper ADB and Fastboot Drivers:
Well, we need ADB and Fastboot driver. I have something special for you guys. I have the setup From XDA Developer that will automatically install the Requirement drivers on your system.
More Information and download link for ADB and Fastboot set up is in the link = Click Here
Now we need Driver for Asus Zenfone 2 Laser ZE550KL. To download click on the link below
Now we need to set mobile. Follow the steps below.
1. Switch off Mobile
2. Press And hold Power Button + Vol Down button Same time and leave the button as soon as you see Asus logo in display of the phone.
Now You are on recovery mode. Use Volume buttons to move up and down and power button for select.
Now press volume down button and select " Apply Update from ADB"
Now we have done all the setup. It's time to Sideload.
Sideload Procedure:
You must have the firmware of your phone to sideload. Currently, i am downgrading my phone from Version 1.16.40.xx TO 1.15.40.xx
Click Here to visit Asus Official website to download Firmware. ( Choose OS= Android -> Firmware)
After Downloading the proper firmware place it on the desktop, we need to flash the phone.
Please, Double check all the steps I have described Above to ignore problems.
Now connect the phone to computer.
Hold Shift and Right click on any blank area on desktop then choose "" Open Command window here"
Then a command window will pop up. Now we need to check whether our phone properly connected to PC and ready to flash or not.
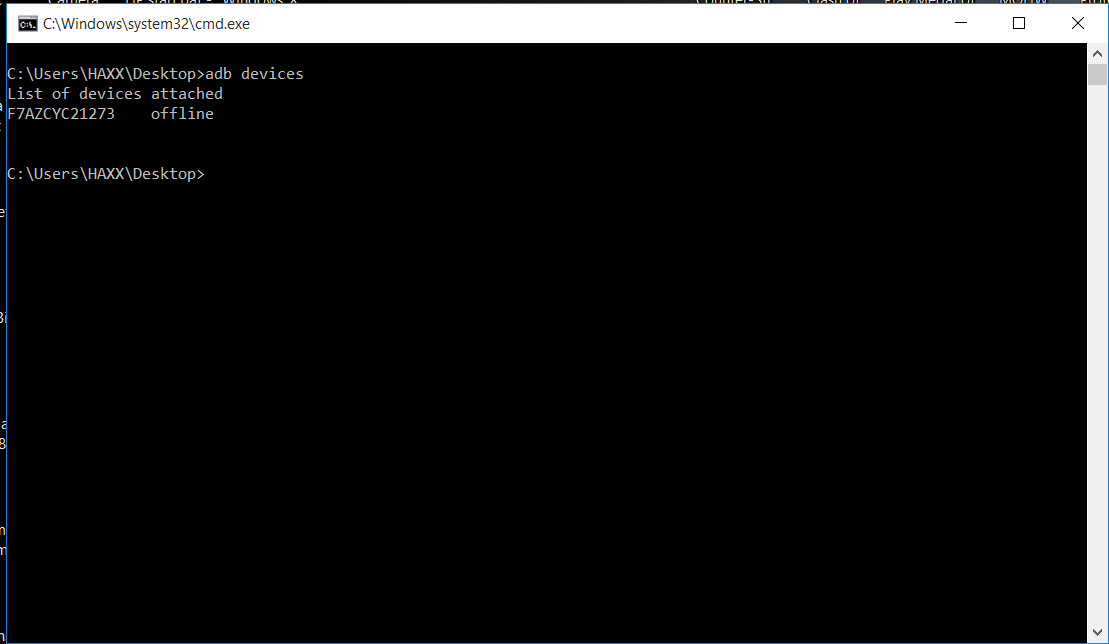
so type the following command in the command window. = "adb devices". After that, you can your phone serial number connected to it. If you can see the serial number then yo are ready to go.
Now type this command = adb sideload filename.zip (EG: adb sideload UL-Z00L-WW-1.15.40.639-user.zip)
NOTE: The firmware file you have downloaded must be placed on the desktop.
Then you will see a loading file .. Wait for few minutes and then it will start serving.
Wait guys its take some time. After 50% complete in Command window just look at your phone and you will see come changes like this.
Now wait for some time and then your phone will say that " Installation from ADB sideload completed"
Now choose reboot the device and your phone will get rebooted.
After this when your phone get on you will see a screen like this
Wait for it to complete. Then your phone is ready to use... Happy
If you want to see video on the steps I did then the video is below and the download link to the video is top of the post
Share this post on FB and other social media to help people having Zenfone 2 Laser.
It's a complicated process so first read properly and then proceed to next step.
This tutorial is based on "ADB sideload with Asus Zenfone 2 laser". I hope you guys did it successfully, if you have any doubts then comment Below.
Visit again for more fun
"Asus ZenFone Blog"
-Vinay
Display replacemnet of Asus ZenFones..
**This Tutorial is the Part 2 of "Broken Zenfone Display FIX"" **Link to Part 1 is :<<++Click Here++>>
In the previous post of this topic we have discussed that what happen with me and how asus help me to get 20% Discount in my New display replacement. Also i have purchased a display FRAME only from Ebay and reddy to Fix that in phone..
Display Quality**
1. Not so Good,
2. Dont have GORIAL GLASS
3. Touch is no so Sentitiv.
4. Essential for Softuse..
Links to the Display buying page is in the Post 1 ..
The display comes in a GOOOD packaging and it was only the frame ... Dont worry its working perfect fror me ,. No dammadge to display and its Looks Good for normal use. The displlay is no so sensitive like a ORIGNAL one but its ok. Display dont have gorila Glass and i have droped the phone a lot but i cant see any dammadge to display.. This display was droped from more Hieght where my orignal Display broken..
If you want to repair and use your zenfone 4 then order that dislay and follow this tutorial to put the display on phone or take the phone and the display to a locak shop, they will fix that for you..
This tutorial is based on " {VIDEO} Zenfone 400cg Display FIX part 2". I hope you read this post carefully, if you have any questions then comment Below, I will feel happy to answer them.
Visit again for more fun
"Asus ZenFone Blog"
-Vinay
Today we have the tutorial to enable Multi-User mode in Zenfone 5/6. This instructions is easy so carefully read and follow.
Asus zenfone doesn't have multi-user mode in it so we have to manually enable it. If you again want to disable it then you can do it also. For this we need our device rooted and it works with Zenfone 500CG / 501CG / 600CG / 601CG. So lets start it.
Make sure that device is Rooted and USB dubbing is enable.
Download and extract on desktop
Connect phone to Computer / Laptop using USB cable.
Go to extracted folder and start application ( install.exe )
Then choose the option there. ( 1 for Enable this feature, 2 for Disable the feature )
Done. Enjoy
Screenshot :
This tutorial is based on " MULTI-USER MODE FOR ASUS ZENFONE 5 / 6". I hope you guys done it successfully, if you have any doubts then comment Below.
Visit again for more fun
"Asus ZenFone Blog"
-Vinaya
Hiiiii friends.. I have something special for you today. Today how to enable Low light mode in Asus zenfone 400CG or CGX. Low light mode is Such a Good Feature. Its not available in Zenfone
400CG. But here is a trick to Add this to Your camera feature.
To start doing this you have to root Zenfone Properly .
Now we have to download and install Root Browser (Link Below)
Now Open root browser and grant SuperSU permissions.
After granting SuperSU permissions locate to System folder in Root Browser.
In System Folder scroll down to bottom , You can now see a file named " Build.app " .
Now Click on that file then a popup window will open then select " RB Text Editor " in the popup Window.
Now You can See some TEXT there.
Note : Dont change Anything un-necessarily , Only make change those things which i said below !! ( IF you make un-necessary changes Then you may BRICK your Phone )
Now search little bit then you can see command like below :
Then Press on Save Button and restart Your Zenfone 4. Open camera app then you can see Low light Mode in it.
Now you are done . Hope you will successfully do this thing. This Tutorial is made by me and fully tested with ASUS ZENFONE 400CG.
Hope you like this tutorial. We will be update very soon with new Posts. Stay Tuned.
Today ZenFone Help blog will Discuses about 8 Apps Which can Be the Best for your Android Phone After rooting it. Rooting android Phone Gives a Better Performance because You can do What ever you want with the Phone ex: Over Clocking , manage Installation space for apps etc etc. Rooting Phone will allow user to get FULL privileges on system so he can Flash a custom ROM Which is Locked by Mobile Companies.
These things are not possible on Unrooted Mobile Phones. And Unrooted Mobile Phone user cant enjoy There System . So below Few Apps which help users to Get bets Performance On there Phone.
List Of Best Root Apps For Rooted Android Phone
#1 Greenify
Greenify app is best to save battery on adnorid phone. It will help you to use the proper function of your battery life. When you install lots of apps , your phone becomes slower . It will boost phone and speed up the phone. It will detect Highest Battery Draining apps and put them into Hibernate mode While they are not in use. In this way it will manage you battery life.
#2 ROM Manager
ROM manager is Also an AWESOME app which can help you a lot with managing ROM. You can recover your phone in latest ClockworkMod recovery. You can backup / restore manage Organised From your Phone. Its provide a UI which is EASY to Operate the app for New Users. You can Install the ROMs from SD card or OVER the AIR. There are A lots of more Features in Premium Version .
#3 Titanium Backup Root
Titanium backup is an Powerful app which is helpful to backup Android device data. Its Pro version have some latest and Use full tools EG : Backup , Freeze, Restore apps/data and other important links. You can create backup for protected apps and other files in SDcard. The Pro-version is AWESOME..
#4 ROOT Explorer
Root Explorer is the ultimate file manager for rot users. Access the whole Android File system Including the exclusive Data Folder. It have some awesome features Like Multiple TAB , Google Drive , Box,DropBox, and Network (SMB) support, SQL, SQL-lite database Viewer, Text editor, Create and extract ZIP or tar/gzip files, Extract rar archives, Multi-Select, Apk Binary-XML viewer send files through Bluetooth, email etc. image thumbnails and more.
#5 Tasker
Tasker Is a Paid app . This app totally automate your android phone. You can design your own overlays. There are many build in plugins which support it. Many triggers which happens the things automatically.
#6 Wanam Xposed
Wanam Exposed is another app for rooted Androoid Users. With the help of the app you can customize your mobile Stock ROM> there are many other featured which you can experience while using this app. You cann disable camera shutter sound because in some mobiles we cannot off the camera shutter sound. You can save call logs view, Enable keyboard symbols and more you can check on google play-store .
#7 CPU Tuner
This is also an Cool app and it Given you A good GRAB on system Control of you phone. CPU tuner gives you control over the power consumption of your Android device. Its main function is to save battery life but you can also overclock android phone if your kernel support it . There are diffrent modes of battery saving and its Powerful app to you.
I hope you like these different types of Powerful and useful android apps. I will try to Update With new apps and news .. Keep Connected with us . Share and Care.
Don' be the parent who uses your smartphone as a Pacifier!!!
Back when / was a kid, kids didn't have smartphones. Actually nobody had smartphone because it was 1990 and my parents made me entertain my self with things like "A Radio" or i made fun playing with them. or cricket.
These days, it seems like everywhere i look there's a toddler playing with his mom's or dad's smartphone- doping it ,drooling on it, putting it in there mouth, And parents reasoning seems to be something like, "Well, that's one way to shut them up."But I'm here to tell you(And i shouldn't have to ): giving your child smartphone is a terrible, terrible idea. Here's why :
It Cost More then 7,000 RS
I don't know about you, but if I'd asked my parents at age 4, to let me play with a device that cost even RS 3,000 ,They'd Have laughed in my face. And yeah, While i know you're not playing (At least) 7,000 RS for your phone thanks to carrier-subsidized pricing. you will be when your kids drop it and you have to replace it before your contact runs out.
Kids have developing motor skills
Your smartphone is made of glass and metal. Mostly glass. You barely keep from dropping it, So you there-year-old ? definitely going to drop it.
They''ll become dependent
You know how you're not supposed to give kids pacifiers all the times to shut them up, because then they'll become dependent on there pacifier ? Same thing with smartphones. And, well, sometime you're going to want to actually use your smartphones. So good luck with that!
They Won't Sleep
Screens-all screens, even tiny smartphone screen - can disrupt your sleep. And kids need sleep. A lot of sleep . Because they're growing, and also because they become obnoxious little jerks when they haven't sleep enough.
They become Social outcast
or maybe not, if every other child they interact with also gets to use there parents' smartphones from an early age. Seriously, thought, face-to-face social interaction is something your child should be learning now, while it's still acceptable to be a socially awkward fool.
Limited creativity
Smartphones turn us into consumers, not creators. remember when you were a kid and you had to use your imagination ?? "What is imagination ?" -Kids today.
Your kids will never see the sun
My parents totally used to do that thing where they wouldn't let me watch TV because i should "go outside and get some fresh air". Well that saddest thing ever i watching your kid go outside ... while glued to a smartphone.
Smartphones are distracting
You usually give your kid your smartphone to distract them , right ? Because you're wattling in line, they're getting bored, and they start fussing. Well, there's a problem here: if you always give your kid a distracting object when they start getting bored, how will they ever learn to deal with boredom ?
Three Words: In. App. Purchases.
Yes, Google will refund unauthorized in app purchases made by your kids. but wattling for a refund is not same as never having that money leave your account in the first place.
They'll eventually want there own
LOL, sorry kid. Maybe when you're 18. And you can buy it yourself.
And one reason you're going to ignore all this and give it to them anyway...
Because there's nothing like the sweet, sweet silence of a toddler entranced by YouTube videos.