http://weloveiconfonts.com/api/?family=entypo (15 minutes)
Welcome to ZenFone Help
Showing posts with label Root. Show all posts


Today I am Going to share one more Awesome post About our Brand New Zenfone 3..
As Zenfone 3 Received the Latest Android N, Some Users want to Root there Zenfone 3 so they can Root there device and Enjoy the complete power of the device..
This Tutorial Will be going Little bit Long  so keep calm..


[DOWNLOAD] All in one Zip (Unlock App + Driver + ADB+Fastboot + TWRP + SuperSU.zip)

We have to Complete 2 Major Things to Root this device.. If you have already done any of this then skip that step..

1. First we have to Unlock Boot Loader

2. Then We have to Install TWRP and Root.

I am gonna make this Into 2 Parts.. If you already have Unlocked Boot Loader then skip the part 1
Lets get start..

PART 1 ( Unlock BootLoader) 


  1. Download The ZIP file I mentioned above and extract it On desktop
  2. Boot Your Zenfone 3 Into Boot Loader ( Turn off the phone then Press and Hold the volume UP and Power Buttons for 3 seconds ). You will be now enter to fastboot mode.
  3. Now Go Open the folder yo have downloaded in step 1 and extracted on desktop, You will see a file "0.Unlock_{Device name}.bat"

    NOTE : If you have the Model ZE520KL then open the " 0.Unlock_ZE520KL.bat "
                 If you have the Model ZE552KL then open the " 0.Unlock_ZE552KL.bat  "  
If the Bat file wont work then you can try to execute the following command

1. for ZE520KL Execute the following command
            * fastboot flash all unlock_ze520kl.raw

2. for ZE552KL Execute the following command
            * fastboot flash all unlock_ze552kl.raw 

Then type the following commands
              * fastboot reboot-bootloader
After the phone gets rebooted automatically to bootloader, Type the following command
               * fastboot oem unlock-go

Then your device will be successfully bootloader unlocked and in this method you will be able to receive OTA updates from Asus, So there is no problem

Now we can move to second Major Step

PART 2 ( Install TWRP recovery and Root) 


In this part we will Install TWRP and Root the device.. Only proccide to this step if you have successfully completed the Part 1.

  1. Now download The TWRP image and "dot.supersu" file from the Link Below


    https://mega.nz/#F!kl8lmKRL!ZbLvz1b4YgLMr_n09vRrT
  2. Download The TWRP images as per your device..
    IE : if you have ZE552KL- Z012D then download ( twrp-3.1.0.0-1-Z012D-20170311.img + dot.supersu )

    if you have ZE520KL- Z017D then download ( twrp-3.1.0.0-1-Z017D-20170311.img + dot.supersu )
Now We are all set, We just need to root the device...
Follow the steps below to root the device..

  1. Boot you Zenfone 3 Into bootloader mode ( Turn off the phone and then press and hold volume up button + power button for 3 seconds )
  2. then you will be able to see the Bootloader mode
  3. Install ADB drivers and Tools from the Link below

    *https://forum.xda-developers.com/showthread.php?t=2588979
  4. Now connect your Zenfone 3 into your Pc / Laptop and use the following command to flash TWRP image

    Command is : fastboot flash recovery twrp-3.0.2-xxx.img
  5. Hold the volume down button, and use the following command to boot into recovery mode ( if menu appears, Please select Recovery mode )

    command : fastboot reboot
  6. Now you phone will boot into TWRP recovery mode
  7. After booting to TWRP recovery mode, select " keep system read only " in TWRP Recovery menu
  8. Use the Following command to push .supersu file into /data
    command : ADB push dot.supersu /data/.supersu
  9. Select " ADB Sideload " in TWRP menu, Then use the following command to push the root files.
    command : adb sideload SuperSU.zip

    Download the SuperSu file from the Link Below:
    https://s3-us-west-2.amazonaws.com/supersu/download/zip/SuperSU-v2.79-201612051815.zip
  10. Reboot and enjoye your Rooted Device..
I Know this Tutorial is a bit Long and Complected.. I might have Post a Video while doing this but i dint have zenfone 3, Sorry for this..

Source : https://forum.xda-developers.com/zenfone-3/help/guide-how-to-root-zenfone-3-ze552kl-t3471524

if you Have any difficulties then please leave a comment and i will try to resolve the issues... 

Admin ZenFone Blog
"-Vinaya"


 All in One tool for Asus Zenfone 3


Hey, Guys.  Today I will share an Awesome tool for Newly Launched Asus Zenfone 3. This tool has many options to do some really interesting things. I am not the original owner of this tool, I am just posting this cool stuff. You can click here to go to the owner's page at XDA.


FEATURES :
  • Check Connection Status
  • Bootloader Unlock
  • Flash TWRP
  • Root Flasher
  • ADB Shell
  • Erase /system, /data and /cache
  • DPI Changer ( Its really cool )
  • Resrart Menu
  • Xposed Installer
  • Xposed Framework
  • Root Checker
There you go.. These are some Critical Operations that can be done by just pressing few buttons with this tool.

PROCEDURE :
  1. Download And Extract the Toolkit RAR file in Desktop
  2. Install ADB Drivers
  3. Enable USB Debugging ( Go to Settings > Developer Option > USB Debugging )
  4. Open the Tool Which you have extracted in Desktop in STEP 1 and Follow the procedure to continue with different kind of functions..
SCREENSHOT :


This tool is very Handy to use and have lots of Great functions that you can use on your device.
If you get confused in any step of any portion, Just drop your comment I will reply back as soon as possible or you can also have live chat with me...
Admin ZenFone Blog
"-Vinaya"


Rooting Asus ZenFone 2 Laser ZE500KL Android M.

With Latest Android M in Asus Zenfone 2 Laser ZE500KL we are ready to rock and roll. Here I have a method to root your Zenfone 2 Laser on Android M. In this tutorial we will see how to root zenfone 2 laser with android M which is just recently released for this device. 

Please read the instruction properly so that you can do it without any problem.


Download:


Instruction:

  1. Install TWRP ( Link to Tutorial Page)
  2. Download the zip file  ( Link in Download Section )
  3. Now extract the file, You can see 2 files inside
  4. Put mobile in Fastboot mode and open CMD window in the file extracted location.
  5. Connect your mobile to pc
  6. Now type the following command.

    * fastboot boot boot_13.10.6.16_patch.img
  7. Now copy the SuperSU file and past into SDcard
  8. Enter into TWRP and flash SuperSu.Zip.
  9. Done.

This tutorial is based on "Rooting Asus ZenFone 2 Laser ZE500KL Android M ". I hope you guys did it successfully, if you have any doubts then comment Below.


Visit again for more fun
                       "Asus ZenFone Blog"
-Vinay


ADB Sideload To Asus ZenFone 2 Laser ZE550KL.

Hellow friends. Today we will do ADB Sideload to Asus ZenFone 2 Laser Ze500KL. This tutorial will be quite complicated and tricky so don't ignore any points otherwise you will be in trouble.
I have also made A Video Tutorial to do so, You can find that video in the bottom part of this post.

There are various step that we need to follow before proceeding to Sideload. The Steps we need to do before installation is written below. 


1. OS specification. 
2. Installing Proper ADB and Fastboot Drivers.
3. Preparing mobile 

So let's start with these Points. 


 OS specification:

Operating System requirements are the most important. We need a correect operating system to install drivers and Do ADB sideload. 
You can use From Windows XP to Windows 8.1. You can't use windows 10 because this OS is totally new and no drivers have released yet from Asus to Install on it. 


 Installing Proper ADB and Fastboot Drivers:

Well, we need ADB and Fastboot driver. I have something special for you guys. I have the setup From XDA Developer that will automatically install the Requirement drivers on your system. 

More Information and download link for ADB and Fastboot set up is in the link = Click Here 


Now we need Driver for Asus Zenfone 2 Laser ZE550KL. To download click on the link below 

                                               +Click Here to Download+

Now for Installation of the driver follow the steps below.

1. Extract the Downloaded file in desktop
2. Go to extracted folder and  (Windows_XP_VISTA_7_8_8.1 -> Android)
3. Right, click on the file (android_winusb.inf) and press on install.

Yes, now you have installed the USB drivers for ZenFone Laser.

We also have created Video Just Choose HD or SD ( High Quality ot Standard Quality )

-----------------------------------------------------------------
1. Click Here for HD Video Tutorial (100MB)
2. Click Here for SD Video Tutorial  (17MB)
--------------------------------------------------------------

Preparing mobile:

Now we need to set mobile. Follow the steps below.

1. Switch off Mobile
2. Press And hold Power Button + Vol Down button Same time and leave the button as soon as you see Asus logo in display of the phone. 

Now You are on recovery mode. Use Volume buttons to move up and down and power button for select.

Now press volume down button and select " Apply Update from ADB"


Now we have done all the setup. It's time to Sideload.

Sideload Procedure:


You must have the firmware of your phone to sideload. Currently, i am downgrading my phone from Version  1.16.40.xx TO 1.15.40.xx

Click Here to visit Asus Official website to download Firmware. ( Choose OS= Android -> Firmware)


After Downloading the proper firmware place it on the desktop, we need to flash the phone. 

Please, Double check all the steps I have described Above to ignore problems. 


Now connect the phone to computer.

Hold Shift and Right click on any blank area on desktop then choose "" Open Command window here"


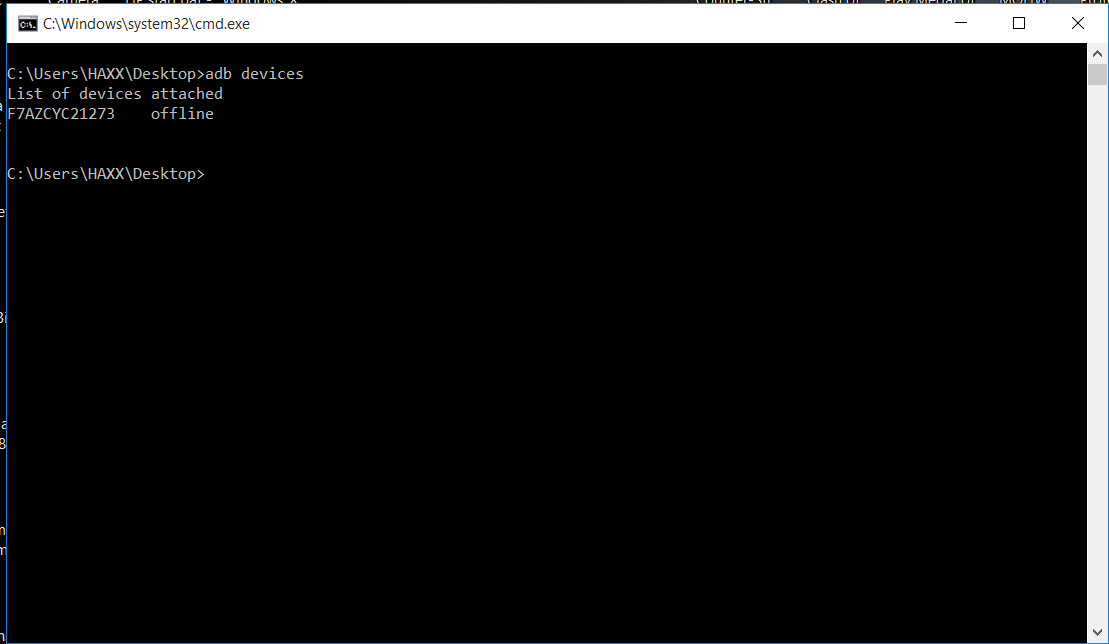
 Then a command window will pop up. Now we need to check whether our phone properly connected to PC and ready to flash or not. 

so type the following command in the command window. = "adb devices". After that, you can your phone serial number connected to it. If you can see the serial number then yo are ready to go.


Now type this command = adb sideload filename.zip (EG: adb sideload UL-Z00L-WW-1.15.40.639-user.zip) 

NOTE: The firmware file you have downloaded must be placed on the desktop.

Then you will see a loading file .. Wait for few minutes and then it will start serving.

Wait guys its take some time. After 50% complete in Command window just look at your phone and you will see come changes like this.


Now wait for some time  and then your phone will say that " Installation from ADB sideload completed"

Now choose reboot the device and your phone will get rebooted. 
After this when your phone get on you will see a screen like this 


Wait for it to complete. Then your phone is ready to use... Happy 

If you want to see  video on the steps I did then the video is below and the download link to the video is top of the post


Share this post on FB and other social media to help people having Zenfone 2 Laser. 

It's a complicated process so first read properly and then proceed to next step.


This tutorial is based on "ADB sideload with Asus Zenfone 2 laser". I hope you guys did it successfully, if you have any doubts then comment Below.


Visit again for more fun
                       "Asus ZenFone Blog"
-Vinay

Install Android M Cyanogen MOD 13 in Asus Zenfone 2 (Z00A / Z008 )


Hi, 
       Cyanogen 13 is running on android 6.0 and we should happy that we are getting this update. Now we can test Android 6.0 because Asus Didn't release it officially for the Zenfone Series. But we can do the installation and still we have a chance to enjoy a powerful OS Cyanogen.

All the installation procedure are given below with the download link to the tools.

#Downloads:


 Recovery: Download 


ROM: 

1. Download ROM for Ze551ML / Z00A

2. Download ROM for Ze550ML / Z008


Boot Loader Unlocker Tool:


#Instructions:

  1. Make sure that you are rooted and Bootloader unlocked.
  2. Download ROM and place it into your Internal memory
  3. SwitchOff Your device. Press & hold power+Volume UP+ Volume Down button. this will take your device to TWRP recovery  ( Download and install TWRP recovery, Link are in download Section.)
  4. Swipe to Install. Wait for the message, Install Successful! Now you have to flash GApps package, GO back to Install.Select Gapps package & Swipe to install
  5. Now Clear Cache & Dalvik Cache. That's all You have to do. reboot the Phone and you are ready to use Cyanogen MOD 13 In Asus Zenfone 2.


This tutorial is based on "Install CYANOGEN MOD 13 in Asus Zenfone 2". I hope you guys did it successfully, if you have any doubts then comment Below.


Visit again for more fun
                       "Asus ZenFone Blog"
-Vinay


This tutorial is for Rooting Asus Zenfone 2 Laser 5.5 (Ze550kl). This method we need to flash system files so carefully read instructions and do the same as written below.


Files To be Download :


Installation :

  1. Download System files from system.img.7z.001 to system.img.7z.006 and extract them and then you will see only one extracted files names as "system.img "
  2. Download recovery.img and boot.img and Flashtools.zip
  3. Extra FlashTools.zip 
  4. Move system.img,recovery.img,boot.img into extracted Flashtools.zip folder.
  5. Turn Off Zenfone 2 laser an boot into recovery mode and connect it to pc/laptop using USB cable
  6. At flashTool folder open command windows by Pressing Shift+Right click --> open command winnows here 
  7. Now Enter the Following command in Command Window.


    fastbot flash boot boot.img
    fastboot flash recovery recovery.img
    fastboot flash system system.img
    fastboot oem reboot-recovery
  8. Wipe Data/factory reset
  9. Enjoy.  With ur Zenfone 2 Rooted. 


This tutorial is based on "ROOT Asus Zenfone 2 Laser Ze550KL". I hope you guys done it successfully, if you have any doubts then comment Below.


Visit again for more fun
                       "Asus ZenFone Blog"
-Vinay


In this tutorial we are going to see How to Root Asus Zenfone Selfie. Read this tutorial Properly then only go for next step.


Files to be Download :

  1. Zenfone Selfie Pre-Rooted System.img, Boot.ing, Recovery.img  ( Click Here to Download )
  2. Download Flash Tools ( Click Here to Download )

Note : There is 2 folder in the Firmware folder. 1 is full which includes all ZenUI apps and another SLIM which Dose not have ZenUI apps but you can Download apps from play-store latter.


Instruction to Flash :

  1. Download FlashTools and Extract it in Desktop Or Anywhere you can
  2. Download SYSTEM Files ( System.img.7z.001 to System.img.7z.007 and extract it Using 7ZIP or Winrar Software.)
  3. After extraction you can see a single file named as "" System.img "" Now move it to FlashTool Folder which you have extracted in Step 1
  4. Download Next 2 Files ( boot.ing and recovery.img ) to FlashTool folder Which you have extracted in Step 1
  5. TurnOff Zenfone Selfie and Boot into Recovery Mode ( Power Button +  vol UP )
  6. Now connect zenfone Selfie to Computer / Laptop Using a Proper USB cable
  7. Now go to FlashTool folder and then Open Command Window there ( Shift + Right click at FlashTool Folder and then --> Open Command Window Here )
  8. Now Enter the Command Written Below


    *fastboot flash boot boot.img
    *fastboot flash recovery recovery.img
    *fastboot flash system system.img
    *fastboot oem reboot-reovery 
  9. Now Wipe data/Factory reset
  10. Finished !!


Note 2: After Doing this You cant update your updates Phone, You have to ADB Side-load your Original Firmware to Get Updates.


This tutorial is based on "ROOT Asus Zenfone Selfie". I hope you guys done it successfully, if you have any doubts then comment Below.


Visit again for more fun
                       "Asus ZenFone Blog"
-Vinay


Welcome to ZenfoneHelp Blog. This post is about to ROOT ASUS ZENFONE 2 Laser. Read Through the post carefully.


Files to be Download :

Supported MODEL :

   Asus Zenfone 2 Laser ZE500KL

Instruction for Installing ADB,Fastboot :

  1. Download ADB,Fastboot and Drivers
  2. RUN adb-setup-1.4.2.exe ( Run as Administrator )
  3. Press Y/YES to install ADB and Fastboot or N/NO to skip
  4. Press Y/YES to install ADB system-Wide or N/NO to skip
  5. Press Y/YES to install Drivers or N/NO to SKIP 
  6. Continue Driver installation
  7. After 15 Second It will finish


Instruction for ROOTING :

  1. Turn Off the Phone and Boot into fastboot mode ( Press Volume UP while Booting UP)
  2. Now Connect you phone to PC/Laptop Using A proper USB cable
  3. Extract The ROOT Files 
  4. Go to the Extracted ROOT files folder and Then Open Command Window ( Press SHIFT + Right Click  --> Open Command Window here )
  5. In Command Window Type The Command Below

       fastboot boot mod_boot.img
  6. Now you phone will get Auto Rebooted with ROOT Installed.

Automated Version of Rooting :

If your device already has USB dubbing activated and you have the proper ADB driver Installed, You can just use this Script. Just connect your Switched on phone and it will do all the steps.

This tutorial is based on "ROOT Zenfone 2 laser (ZE500KL)". I hope you guys done it successfully, if you have any doubts then comment Below.


Visit again for more fun
                       "Asus ZenFone Blog"
-Vinay


Hyy Friends..Today i have something special for you all. You may Know or may not know, But its an interesting post. Today i have Boot Loader Unlocked for Asus Zenfone Series. Then What is BootLoader Unlock ?

Ans: As Per Tom-hardware Guide

A locked or unlocked boot-loader is what gives you access to “root.” “Root” is another big word in the Android community.  If you “root” a device, it means you have “super user” access or “administrator” access to the operating system that runs on your phone.Think about Windows for a second. When you either install a new version of Windows or set up your computer for the first time, you set up the first user or the administrator.  That user has access to all the bells and whistles that lay behind Windows—hidden files, control panels, you name it. A phone with “root” access allows you access to all the features hidden under the pretty user interface on your phone.


Asus Made these Tool to Unlock Bootloader for the user who want to customize there devices.
But there are some Important points you have to go through before Unlocking your boot loader

Notes:  By Unlocking Boot Loader ,you are going to loose your warranty permanently. Its Not recommended for Normal users. 

Download Links are below for Different Zenfone.


#1 Asus Zenfone A400CG 


BootLoader Unlocker for Asus Zenfone 400CGClick Here


#2 Asus Zenfone A500CG 


BootLoader Unlocker for Asus Zenfone 500CGClick Here


#3 Asus Zenfone A600CG 


BootLoader Unlocker for Asus Zenfone A600CGClick Here


#4 Asus Zenfone 2 (ZE550ML / ZE551ML)


BootLoader Unlocker for Asus Zenfone ZE550MLClick Here
BootLoader Unlocker for Asus Zenfone ZE551MLClick Here


Download the Tools as per your Mobile, Extract with WINRAR and Install in your Phone Directly. 

Some of the devices are not in the list because there is no boot loader Unlocked is available for Them. We will Update The List as soon as the Asus release them. .


"ZenFone Blog" 
-Vinaya


Visit Again for more FUN :D


Today ZenFone Help blog will Discuses about 8 Apps Which can Be the Best for your Android Phone After rooting it. Rooting android Phone Gives a Better Performance because You can do What ever you want with the Phone ex: Over Clocking , manage Installation space for apps etc etc. Rooting Phone will allow user to get FULL privileges on system so he can Flash a custom ROM Which is Locked by Mobile Companies.
These things are not possible on Unrooted Mobile Phones. And Unrooted Mobile Phone user cant enjoy There System .  So below Few Apps which help users to Get bets Performance On there Phone.
        

List Of Best Root Apps For Rooted Android Phone 


#1 Greenify


 Greenify app is best to save battery on adnorid phone. It will help you to use the proper function of your battery life. When you install lots of apps ,  your phone becomes slower . It will boost phone and speed up the phone. It will detect Highest Battery Draining apps and put them into Hibernate mode While they are not in use.  In this way it will manage you battery life. 


#2 ROM Manager


ROM manager is Also an AWESOME app which can help you a lot with managing ROM. You can recover your phone in latest ClockworkMod recovery. You can backup / restore manage Organised From your Phone. Its provide a UI which is EASY to Operate the app for New Users. You can Install the ROMs from SD card or OVER the AIR. There are A lots of more Features in Premium Version . 


#3 Titanium Backup Root


Titanium backup is an Powerful app which is helpful to backup Android device data.  Its Pro version have some latest and Use full tools EG : Backup , Freeze, Restore apps/data and other important links. You can create backup for protected apps and other files in SDcard. The Pro-version is AWESOME..  


#4 ROOT Explorer


Root Explorer is the ultimate file manager for rot users. Access the whole Android File system Including the exclusive Data Folder. It have some awesome features Like Multiple TAB , Google Drive , Box,DropBox, and Network (SMB) support, SQL, SQL-lite database Viewer, Text editor, Create and extract ZIP or tar/gzip files, Extract rar archives, Multi-Select, Apk Binary-XML viewer send files through Bluetooth, email etc. image thumbnails and more.                                                                                                                                                                                                                                                                                                                                  


#5 Tasker


Tasker Is a Paid app . This app totally automate your android phone. You can design your own overlays. There are many build in  plugins which support it. Many triggers which happens the things automatically.


#6 Wanam Xposed


Wanam Exposed is another app for rooted Androoid Users. With the help of the app you can customize your mobile Stock ROM> there are many other featured which you can experience while using this app. You cann disable camera shutter sound because in some mobiles we cannot off the camera shutter sound. You can save call logs view, Enable keyboard symbols and more you can check on google play-store .


#7 CPU Tuner


This is also an Cool app and it Given you A good GRAB on system Control of you phone. CPU tuner gives you control over the power consumption of your Android device. Its main function is to save battery life but you can also overclock android phone if your kernel support it . There are diffrent modes of battery saving and its Powerful app to you. 


I hope you like these different types of Powerful and useful android apps. I will try to Update With new apps and news .. Keep Connected with us . Share and Care. 


Today i will share the post on Rooting Zenfone 450Cg. Asus Has recently provided System Update from Kitkat to Lollipop. So the system is totally changed .Therefore i decided to make a root method 
for New lollipop Updated Asus Zenfone 450Cg .

Read the Whole Article and instruction for Error-less Rooting. 


So lets Start Rooting...


Instructions-->
Download 3 Files By Pressing on Download button below.

SuperSu.zip and UpdateCMW.zip
  1.  Install Adb Drivers and Intel Drivers Correctly ( Skip if you already installed)
  2.  Now Download The 3 Files . ( SuperSu.zip ,updateCMW.zip and Adb Fastboot Tool)
  3.  Extract Adb Fastboot.zip  and move UpdateCmw.zip into it.
  4. Move SuperSup.zip to SdCard.
  5. Now Put Phone Into Droid Boot Mode.
  6. Connect Phone to Computer/Laptop Using USB cable.
  7. Open Adb Fastboot folder then Open "CMD.bat"
  8. A Command window will Open then Type fastboot flash update updateCMW.zip
  9. Wait Untill Your Phone boot Into Custom Boot Mode.
  10. After Phone Boots in Custom Boot Mode Then Choose"update from sdcard"
  11. Then Select SuperSu.zip And then Select "Yes"
  12. Then Reboot Zenfone 450Cg . If any popup Apear then Seclect "no"
  13. Done............

Now Enjoy Rooted Zenfone 450Cg.

Note: Custom recovery mode Will Appear only Once . If you Restart Phone Then Stock recovery Mode will be back .


Thanks . Visit Again for More Interesting Stuffs.. WWW.ZENFONEHELP.COM


Hello friend. today i am going to introduce a program that can root all zenfone models.

Notice:

  1. This Program will work on Zenfone 4/5/6 with KITKAT or LOllipop Version and also zenfone 2 (ZE500CL / ZE500ML / ZE551ML)
  2. If You want to install Any system update then Unroot First Then install update Otherwise Phone will be in boot Loop
  3. Install Intel Usb Driver and Asus Driver First.


Now Download The Root Files By Click Download button Below.


1. After Downloading Files , Extract On desktop.
2. Turn On USB dubbing In Zenfone
3. Run Root.bat From Extracted Folder

It will take 30 Second From Your Phone Goes into Droid Boot Mode. Keep patient.


Happy Rooting.


Hey Guyssss. Lets start to root Our Zenfone 5 With Lollipop Inside.

I am going to post a Method To root Asus zenfone 5 Properly and Easy . You just Need a Desktop or Laptop To perform This Method.


System Requirements::

1. Windows OS with A PC/Laptop.

2. Correct Drivers Installed.

3. Root Files.

4. Almost A Brain..


So lets Start...............

First of all Download The Root Files From The Link Below.


 Installation Instructions..:


  1. Download the Files And Extract.
  2. Enable USB dubbing in Phone.
  3. Connect Zenfone 5 To PC/Laptop.
  4. Open Extracted Folder 
  5. Then Run Root.bat File.
  6. Now it will start Rooting Your Phone, Wait until It finish.
  7. If Any Notification Appear " Press Any key To  Continue" then Press Any Key from keyboard.
  8. If Rooting Process Completes then Zenfone 5 Will Reboot Automatically
  9. After Rooting Check there Must be a SuperSU app Installed.
  10.  Wollaaa You have Rooted...

If You are Faild To root then Check Following Possible Reason.

1. Must Have Installed ADV drivers.
2. Check USB dubbing On In Phone.
3. Check the USB cable not  Damaged.


In any case You want to Unroot Zenfone 5 then Follow the Procedure Below.


How To Unroot Zenfone 5::


  1. Open SuperSu app in phone.
  2. Then Go to Settings Menu.
  3. CheckBox Full unroot.
  4. Done. 

Now You have successfully unrooted.


Have a Nice Day . Happy Rooting. I hope you will Done This Method Perfectly . Thanks for Visiting Zenfonehelp blog . Stay Tuned for more Interesting Stuffs.